TFS Build with a Custom Task and TFSBuild.proj
TFS allows modifying its build process with custom tasks. You can write your own task and incorporate it into the build. This task or code is contained within Target elements of the MSBuild project file.
Each task that you implement as a part of the build must be implements as a .NET class and utilize ITask interface. This interface is defined in the Microsoft.Build.Framework.dll assembly.
After you have your task build you need to register it and call it at the appropriate time so that it executes at the desired spot in the build process. You can register your task with the TfsBuild.proje file in the folder where you have you build stored. You also have to have ADMINISTER_BUILD permission to be able to check in the TFSBuild.proj file. ADMINISTER_BUILD provided create, edit, delete and manage builds permissions.
There are other additional permissions you need to be aware of while working with the build TFSBuild.proj file.
- START_BUILD – allows you to start a build via command line or TFS interface.
- UPDATE_BUILD – allows you to update TFS database store.
- EDIT_BUILD_STATUS – allows users to add info to the quality of the build.
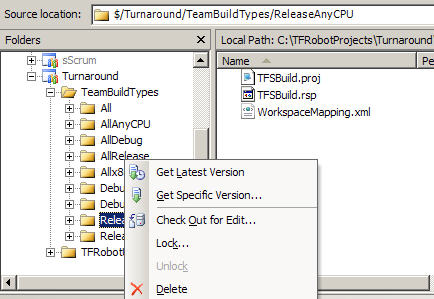
There will be times when we will need to remove build from the project due to various reasons. In order to do so you will need to use Team Explorer and following distinct steps.
- Click View menu, then Other Windows option and then Source Control Explorer option to open up Source Control.
- In the Source Control Explorer find build folder that you want to remove. This folder will be located under Drive:\Team Project\Team Build Types\Build Type\Folder Path.
- After selecting a folder press Delete from the menu in order to remove all the files utilized by the build.
TSFBuild.proj
TFS has several command line tools that can be used to manage Builds. For instance TFSBuild command line allows to delete several builds at once, you can also start and stop builds with this tool. In order to delete more then one Build from the TFS you need to execute following line of code
TFSBuild delete TFSServerName TFSApplication TFSBuild1 TFSBuild2
In case we don’t want to delete but temporary stop builds of the project on the server, we need to run following statements: TFSBuild start and stop. This two commands allow us to start and stop builds as we wish.
TFSBuild start TFSServerName TFSApplication TFSBuild1 TFSBuild2
TFSBuild stop TFSServerName TFSApplication TFSBuild1 TFSBuild2
TFSBuild file example
<?xml version="1.0" encoding="utf-8"?>
<Project DefaultTargets="DesktopBuild" xmlns="http://schemas.microsoft.com/developer/msbuild/2003">
<!-- TO EDIT BUILD TYPE DEFINITION
To edit the build type, you will need to edit this file which was generated
by the Create New Build Type wizard. This file is under source control and
needs to be checked out before making any changes.
The file is available at -
$/{TeamProjectName}/TeamBuildTypes/{BuildTypeName}
where you will need to replace TeamProjectName and BuildTypeName with your
Team Project and Build Type name that you created
Checkout the file
1. Open Source Control Explorer by selecting View -> Other Windows -> Source Control Explorer
2. Ensure that your current workspace has a mapping for the $/{TeamProjectName}/TeamBuildTypes folder and
that you have done a "Get Latest Version" on that folder
3. Browse through the folders to {TeamProjectName}->TeamBuildTypes->{BuildTypeName} folder
4. From the list of files available in this folder, right click on TfsBuild.Proj. Select 'Check Out For Edit...'
Make the required changes to the file and save
Checkin the file
1. Right click on the TfsBuild.Proj file selected in Step 3 above and select 'Checkin Pending Changes'
2. Use the pending checkin dialog to save your changes to the source control
Once the file is checked in with the modifications, all future builds using
this build type will use the modified settings
-->
<!-- Do not edit this -->
<Import Project="$(MSBuildExtensionsPath)\Microsoft\VisualStudio\v8.0\TeamBuild\Microsoft.TeamFoundation.Build.targets" />
<ProjectExtensions>
<!-- DESCRIPTION
The description is associated with a build type. Edit the value for making changes.
-->
<Description>
</Description>
<!-- BUILD MACHINE
Name of the machine which will be used to build the solutions selected.
-->
<BuildMachine>MyBuildMachine</BuildMachine>
</ProjectExtensions>
<PropertyGroup>
<!-- TEAM PROJECT
The team project which will be built using this build type.
-->
<TeamProject>MyTeamProject</TeamProject>
<!-- BUILD DIRECTORY
The directory on the build machine that will be used to build the
selected solutions. The directory must be a local path on the build
machine (for example, c:\build).
-->
<BuildDirectoryPath>d:\build</BuildDirectoryPath>
<!-- DROP LOCATION
The location to drop (copy) the built binaries and the log files after
the build is complete. This location must be a valid UNC path of the
form \\Server\Share. The build machine service account and application
tier account must have read write permission on this share.
-->
<DropLocation>\\MyDropServer\drops</DropLocation>
<!-- TESTING
Set this flag to enable/disable running tests as a post build step.
-->
<RunTest>true</RunTest>
<!-- WorkItemFieldValues
Add or edit key value pairs to set values for fields in the work item created
during the build process. Please make sure the field names are valid
for the work item type being used.
-->
<WorkItemFieldValues>Priority=1;Severity=1</WorkItemFieldValues>
<!-- CODE ANALYSIS
To change CodeAnalysis behavior, edit this value. Valid values for this
can be Default, Always, or Never.
Default - To perform code analysis according to individual project settings.
Always - To always perform code analysis irrespective of project settings.
Never - To never perform code analysis irrespective of project settings.
-->
<RunCodeAnalysis>Default</RunCodeAnalysis>
<!-- UPDATE ASSOCIATED WORK ITEMS
Set this flag to enable/disable updating associated work items on a successful build
-->
<UpdateAssociatedWorkItems>true</UpdateAssociatedWorkItems>
</PropertyGroup>
<ItemGroup>
<!-- SOLUTIONS
The path of the solutions to build. To add or delete solutions, edit this
value. For example, to add a solution MySolution.sln, add following line -
<SolutionToBuild Include="$(SolutionRoot)\path\MySolution.sln" />
To change the order in which the solutions are built, modify the order in
which the solutions appear below.
-->
<SolutionToBuild Include="$(SolutionRoot)\ConsoleApplication7\ConsoleApplication7.sln" />
</ItemGroup>
<ItemGroup>
<!-- CONFIGURATIONS
The list of configurations to build. To add or delete configurations, edit
this value. For example, to add a new configuration, add the following lines -
<ConfigurationToBuild Include="Debug|x86">
<FlavorToBuild>Debug</FlavorToBuild>
<PlatformToBuild>x86</PlatformToBuild>
</ConfigurationToBuild>
The Include attribute value should be unique for each ConfigurationToBuild node.
-->
<ConfigurationToBuild Include="Release|Any CPU">
<FlavorToBuild>Release</FlavorToBuild>
<PlatformToBuild>Any CPU</PlatformToBuild>
</ConfigurationToBuild>
<ConfigurationToBuild Include="Debug|Any CPU">
<FlavorToBuild>Debug</FlavorToBuild>
<PlatformToBuild>Any CPU</PlatformToBuild>
</ConfigurationToBuild>
<ConfigurationToBuild Include="Debug|x86">
<FlavorToBuild>Debug</FlavorToBuild>
<PlatformToBuild>x86</PlatformToBuild>
</ConfigurationToBuild>
<ConfigurationToBuild Include="Release|x86">
<FlavorToBuild>Release</FlavorToBuild>
<PlatformToBuild>x86</PlatformToBuild>
</ConfigurationToBuild>
</ItemGroup>
<ItemGroup>
<!-- TEST ARGUMENTS
If the RunTest is set to true then the following test arguments will be
used to run tests.
To add or delete new testlist or to choose a metadata file (.vsmdi) file, edit this value.
For example, to run BVT1 and BVT2 type tests mentioned in the Helloworld.vsmdi file, add the following -
<MetaDataFile Include="$(SolutionRoot)\HelloWorld\HelloWorld.vsmdi">
<TestList>BVT1;BVT2</TestList>
</MetaDataFile>
Where BVT1 and BVT2 are valid test types defined in the HelloWorld.vsmdi file.
MetaDataFile - Full path to test metadata file.
TestList - The test list in the selected metadata file to run.
Please note that you must specify the .vsmdi file relative to $(SolutionRoot)
-->
<MetaDataFile Include="$(SolutionRoot)\ConsoleApplication7\ConsoleApplication7.vsmdi">
<TestList>P1 Tests;P2 Tests</TestList>
</MetaDataFile>
</ItemGroup>
<ItemGroup>
<!-- ADDITIONAL REFERENCE PATH
The list of additional reference paths to use while resolving references.
For example,
<AdditionalReferencePath Include="C:\MyFolder\" />
<AdditionalReferencePath Include="C:\MyFolder2\" />
-->
</ItemGroup>
<UsingTask TaskName="BuildTask.BinSize" AssemblyFile="$(SolutionRoot)\\tools\\BuildTask.dll" />
<Target Name="BeforeDropBuild">
<BinSize SourceDir="$(SolutionRoot)" />
</Target>
</Project>